 Plans for the Station Molds |
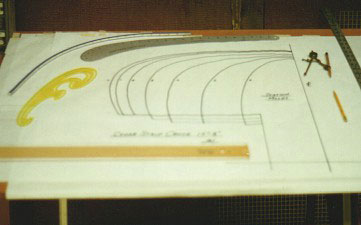
Building our Cedar Strip Canoe will require a plan. The plan can be taken from a book, purchased from a canoe builder or lines taken (measurements) from an existing canoe, a procedure called lofting. Our plan is a combination of lines drawn by others with my own modifications. It is close to that of a White Guide Canoe. I wanted a little more freeboard (height at the center sheerline from the water), a little more width for greater stability, a sharper entry into the water and a little more tumblehome for easier paddling. The shape of the lines on the plan, for each station mold, represents the ultimate shape of the canoe. When placed on the strongback, the station molds will represent the lines of the canoe. The picture of the drawings for the station molds is our plan - it is drawn as a half-plan.
 Station molds |
Now that we have a plan we can proceed with the construction of our cedar strip canoe. The material for the molds will be 5/8" particle board. We will need two 4'X8' sheets. We will place the plan on the particle board and trace the shape for each mold including the two stem molds. After the mold line is drawn on the board, move to a clear space on the board and draw the next mold line. When we are done we will have lines drawn for thirteen station molds and two identical stem molds. With a jig saw we will cut out the shape of each mold. We'll have the largest mold numbered #0. This will be the center of the canoe. The next size will be #1 - we'll make two of these, and so on through mold #6 (two of each). Sand the edges of the molds and check that all the curved lines are fair. Now we will put the molds aside and build the strongback on which the molds will be fastened.
 The Strongback |
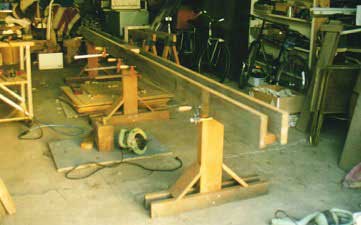
The strongback is the foundation on which we will build our canoe so it must be sturdy. We'll take two pieces of 2"X6" lumber 16' long, set them side by side on the floor and fasten them together with short spacers of 2"X4". At the center and at each end we'll insert the 4"X4"X20" legs and then build feet on the legs. See picture. Turn this over on its feet and we have a strongback. Almost any material can be used to build the strongback as long as it makes a sturdy, straight base on which to build a canoe.
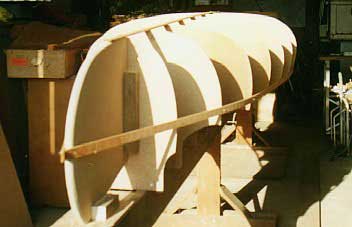
On the strongback, at the center (the 8' mark) we will draw a line square across the two planks. Now draw similar lines every 12 inches going both ways from the center line. At each of these lines we will screw down a piece of 2"X2". These are the points at which the station molds will be fastened. On molds #6 we will draw a line up the center from base to top. This is where the stem molds will be fastened - same method as the station molds to the strongback. All the molds must be in exact position to create the fair lines of the canoe. To check this we attach one of our cedar strips (next page) to the sides of the molds and one to the top edge at center. We can now sight along these strips to see if all the molds are in the right position. If one or more are not fair with the strips they will have to be adjusted. We see now, as in the molds picture that our canoe is being built up-side-down. Now lets see about strips.
 Home
Home